前言
好久没写博文了,最近刚好搞完安卓的期末大作业,顺便记录一下
Android
这次安卓期末考试搞了一个笔记系统,由于时间原因(主要还是我太懒了),其它功能没有加上去,就一个查看笔记功能,修改和添加这些还没有加上,下面记录一下
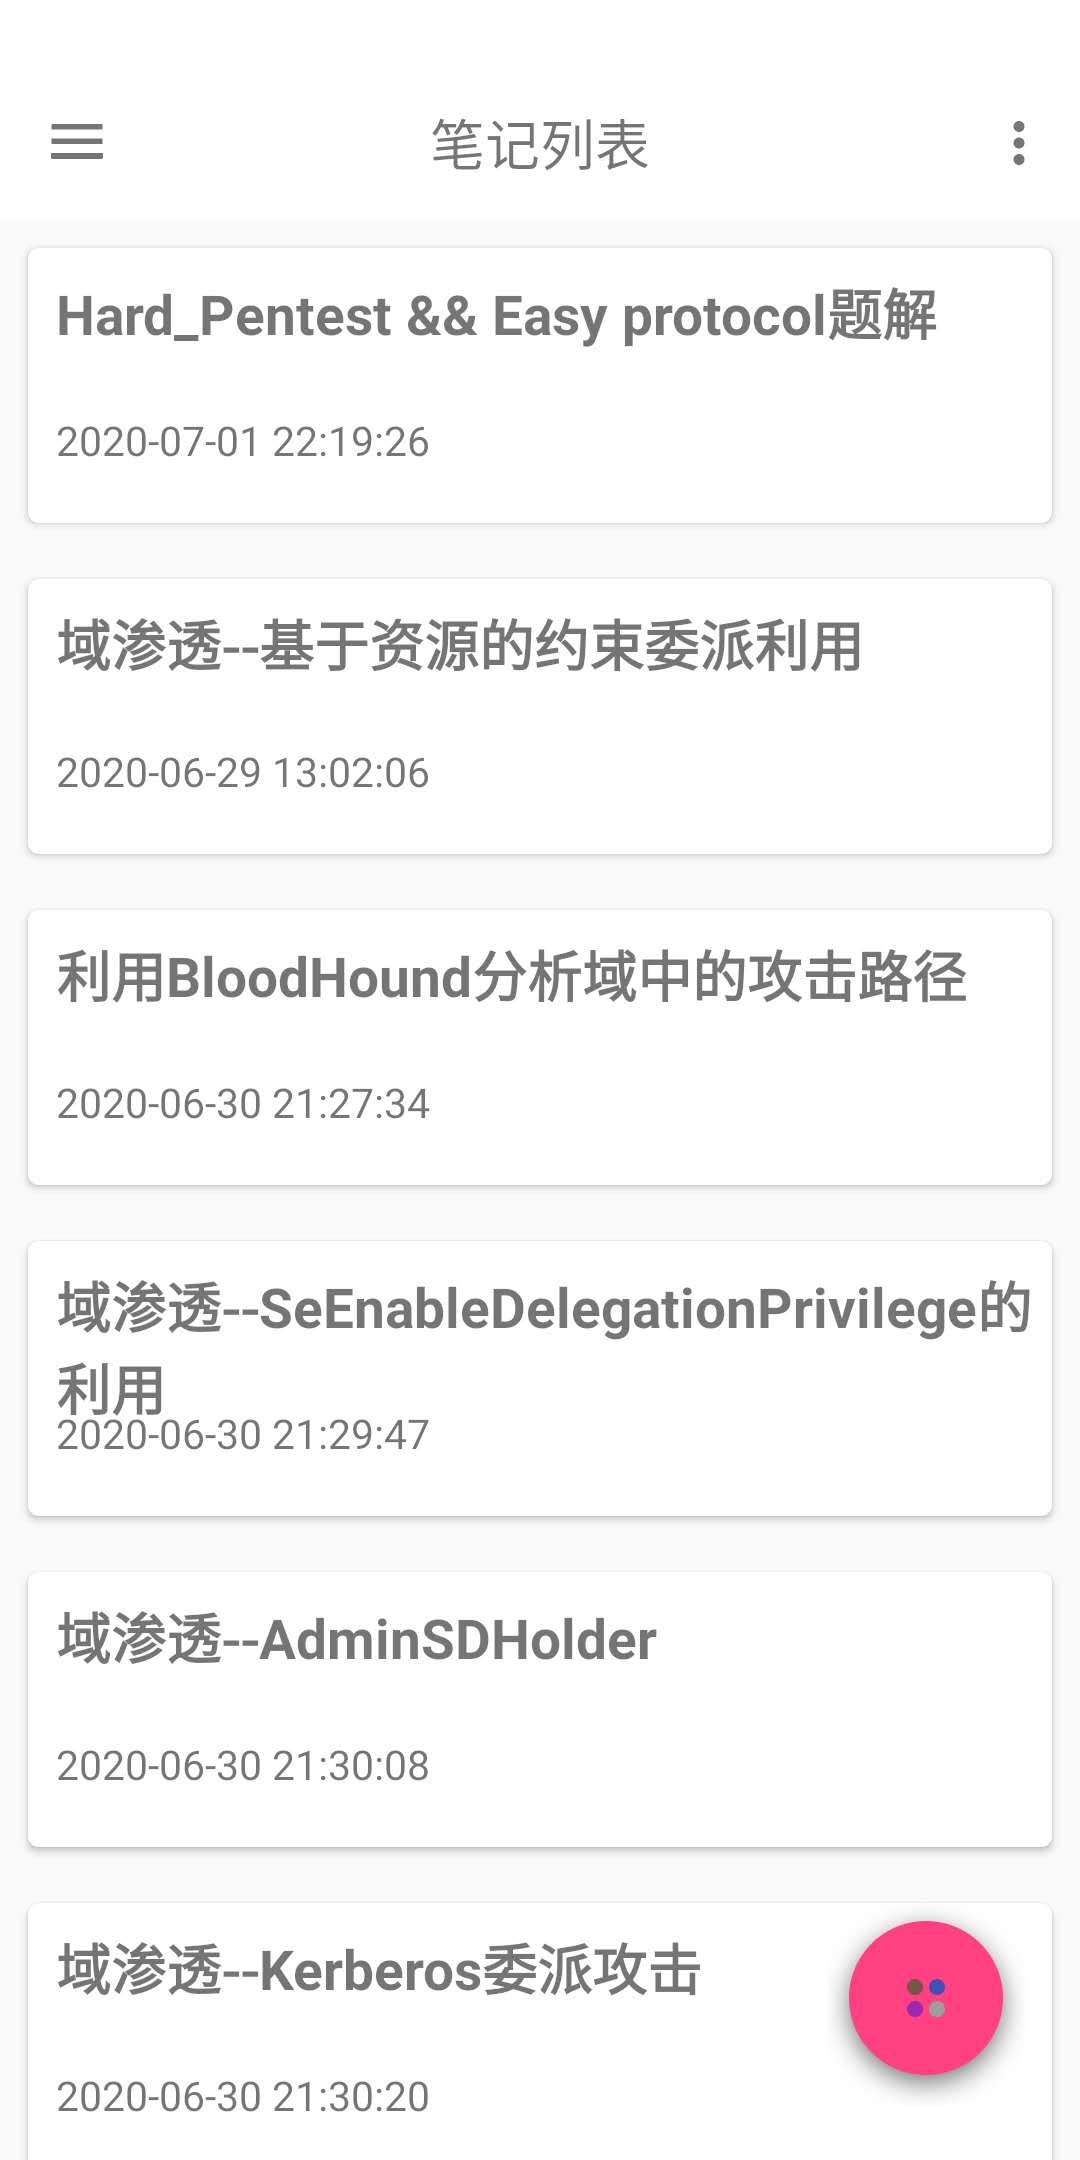
RecyclerView
展示笔记列表用的是baseRecyclerViewAdapterHelper这个库,个人感觉这个库还是比较不错的
1
| implementation 'com.github.CymChad:BaseRecyclerViewAdapterHelper:2.9.50'
|
代码如下:
1
2
3
4
5
6
7
8
9
10
11
12
13
14
15
16
17
18
19
20
21
22
23
24
25
26
27
28
29
30
31
32
33
34
35
36
37
38
39
40
41
42
43
44
45
46
47
| public void InitRecyclerView() {
RecyclerView recyclerView=(RecyclerView)findViewById(R.id.recycler);
Connect connect=new Connect("qiyou","admin123");
recyclerView.setLayoutManager(new LinearLayoutManager(this));
try {
connect.Login();
} catch (IOException e) {
e.printStackTrace();
}
ArrayList<Map> arrayList= null;
try {
arrayList = connect.GetAllNote();
} catch (IOException e) {
e.printStackTrace();
}
for (int i=0;i<arrayList.size();i++){
HomeItem item = new HomeItem();
item.setTitle((String) arrayList.get(i).get("title"));
item.setTime((String) arrayList.get(i).get("modify_date"));
item.setId((String) arrayList.get(i).get("id"));
data.add(item);
}
HomeAdapter adapter = new HomeAdapter(R.layout.ry, data);
adapter.openLoadAnimation(BaseQuickAdapter.SCALEIN);
adapter.isFirstOnly(false);
adapter.setOnItemClickListener(new BaseQuickAdapter.OnItemClickListener() {
@Override
public void onItemClick(BaseQuickAdapter adapter, View view, int position) {
TextView title = (TextView) adapter.getViewByPosition(recyclerView, position, R.id.tv_title);
Intent intent=new Intent(MainActivity.this,Main2Activity.class);
intent.putExtra("id",title.getTag().toString());
intent.putExtra("title",title.getText());
startActivity(intent);
}
});
recyclerView.setAdapter(adapter);
}
|
添加adapter.openLoadAnimation(BaseQuickAdapter.SCALEIN)可以加一个动画效果
适配器如下:
1
2
3
4
5
6
7
8
9
10
11
12
13
14
15
16
17
18
19
| public class HomeAdapter extends BaseQuickAdapter<HomeItem, BaseViewHolder> {
public HomeAdapter(int layoutResId, List data) {
super(layoutResId, data);
}
@Override
protected void convert(BaseViewHolder helper, HomeItem item) {
helper.setText(R.id.tv_title, item.getTitle());
helper.setText(R.id.tv_time, item.getTime());
helper.setTag(R.id.tv_title,item.getId());
}
@Override
protected void startAnim(Animator anim, int index) {
super.startAnim(anim, index);
if (index < 10)
anim.setStartDelay(index * 150);
}
}
|
layout
1
2
3
4
5
6
| <androidx.recyclerview.widget.RecyclerView
android:id="@+id/recycler"
app:layout_behavior="@string/appbar_scrolling_view_behavior"
android:layout_width="match_parent"
android:layout_height="wrap_content">
</androidx.recyclerview.widget.RecyclerView>
|
效果如下:
1.jpg
Markdown解析
关于笔记的解析,这里是采用了Markdown解析,因为其它的排版看起来比较丑,而且我个人平时无论是写笔记还是写博客都是用的md。这里我使用的框架是materialdrawer,这个主题是Github的解析形式,还是比较不错的,支持代码高亮、数学表达式等
1
2
| final def lastestMaterialDrawerRelease = '6.1.2'
implementation "com.mikepenz:materialdrawer:$lastestMaterialDrawerRelease"
|
代码如下,省略部分无关代码
1
2
3
4
5
6
7
8
9
10
11
12
13
| Toolbar toolbar = findViewById(R.id.toolbar);
setSupportActionBar(toolbar);
getSupportActionBar().setDisplayHomeAsUpEnabled(true);
getSupportActionBar().setHomeButtonEnabled(true);
Connect conn=new Connect("","");
MarkdownView mMarkdownView = (MarkdownView)findViewById(R.id.markdown_view);
mMarkdownView.addStyleSheet(new Github());
try {
mMarkdownView.loadMarkdown(conn.GetNote(intent.getStringExtra("id")));
} catch (IOException e) {
e.printStackTrace();
}
|
这里的getSupportActionBar().setDisplayHomeAsUpEnabled(true);主要是屏蔽原来toolbar带来的颜色问题,让我们笔记观看得更加“沉浸”
Layout文件,这个没什么好说的把MarkdownView套在NestedScrollView下让其滑动,然后那个FloatingActionButton是一个修改笔记的Button,但是功能没有加上去,就一个布局
1
2
3
4
5
6
7
8
9
10
11
12
13
14
15
16
17
18
19
20
21
22
23
24
| <androidx.core.widget.NestedScrollView
android:layout_width="match_parent"
android:layout_height="match_parent"
app:layout_behavior="@string/appbar_scrolling_view_behavior">
<br.tiagohm.markdownview.MarkdownView
android:id="@+id/markdown_view"
app:escapeHtml="false"
android:layout_width="match_parent"
android:layout_height="match_parent"/>
</androidx.core.widget.NestedScrollView>
<com.github.clans.fab.FloatingActionButton
android:id="@+id/fab"
android:layout_width="wrap_content"
android:layout_height="wrap_content"
android:layout_gravity="bottom|right"
android:layout_marginBottom="8dp"
android:layout_marginRight="8dp"
android:src="@drawable/ic_pen_3"
fab:fab_colorNormal="@color/colorWhite"
fab:fab_colorPressed="#D5D5D5"
fab:fab_colorRipple="@color/colorWhite"/>
|
最终效果如下:
demo1.gif
笔记密码
这个是我在Github看到一个不错的库随手加了上去,主要还是UI好看,支持手势密码,不过有一个缺点就是加载比较慢,不知道是我姿势问题还是库的问题
1
| implementation 'com.andrognito.pinlockview:pinlockview:2.1.0'
|
代码如下:
1
2
3
4
5
6
7
8
9
10
11
12
13
14
15
16
17
18
19
20
21
22
23
24
25
26
27
28
29
30
31
32
| mPinLockView = (PinLockView) findViewById(R.id.pin_lock_view);
mIndicatorDots = (IndicatorDots) findViewById(R.id.indicator_dots);
mPinLockView.attachIndicatorDots(mIndicatorDots);
mPinLockView.setPinLockListener(mPinLockListener);
mPinLockView.setPinLength(4);
mPinLockView.setTextColor(ContextCompat.getColor(this, R.color.white));
mIndicatorDots.setIndicatorType(IndicatorDots.IndicatorType.FILL_WITH_ANIMATION);
}
private PinLockListener mPinLockListener = new PinLockListener() {
@Override
public void onComplete(String pin) {
if (pin.equals(password)){
finish();
}
}
@Override
public void onEmpty() {
}
@Override
public void onPinChange(int pinLength, String intermediatePin) {
}
};
|
layout文件如下:
1
2
3
4
5
6
7
8
9
10
11
12
13
14
15
16
17
18
19
20
21
22
23
24
25
26
27
28
29
30
31
32
33
34
35
36
37
38
39
40
41
42
43
44
45
46
47
48
49
50
51
52
53
| <?xml version="1.0" encoding="utf-8"?>
<RelativeLayout xmlns:android="http://schemas.android.com/apk/res/android"
xmlns:app="http://schemas.android.com/apk/res-auto"
xmlns:tools="http://schemas.android.com/tools"
android:layout_width="match_parent"
android:layout_height="match_parent"
android:background="@color/mine_shaft"
android:fitsSystemWindows="true"
tools:context=".PinActivity">
<ImageView
android:id="@+id/profile_image"
android:layout_width="84dp"
android:layout_height="84dp"
android:layout_centerHorizontal="true"
android:layout_marginTop="104dp"
android:src="@drawable/ic_pen_2" />
<TextView
android:id="@+id/profile_name"
android:layout_width="256dp"
android:layout_height="wrap_content"
android:layout_below="@+id/profile_image"
android:layout_centerHorizontal="true"
android:layout_marginTop="36dp"
android:fontFamily="sans-serif-thin"
android:gravity="center"
android:maxLines="1"
android:text="此文章已被加密"
android:textColor="@color/white"
android:textSize="20sp" />
<com.andrognito.pinlockview.IndicatorDots
android:id="@+id/indicator_dots"
android:layout_width="wrap_content"
android:layout_height="wrap_content"
android:layout_below="@id/profile_name"
android:layout_centerHorizontal="true"
android:layout_marginTop="36dp" />
<com.andrognito.pinlockview.PinLockView
android:id="@+id/pin_lock_view"
android:layout_width="wrap_content"
android:layout_height="wrap_content"
android:layout_below="@id/indicator_dots"
android:layout_centerHorizontal="true"
android:layout_marginTop="16dp"
app:keypadButtonSize="72dp"
app:keypadShowDeleteButton="true"
app:keypadTextColor="@color/white"
app:keypadTextSize="18dp" />
</RelativeLayout>
|
效果如下:
demo2.gif
Welcome
一个欢迎页面,一般app第一次打开都会一个welcome的页面,所以加了上去
1
| implementation 'com.stephentuso:welcome:1.4.1'
|
代码如下
1
2
3
4
5
6
7
8
9
10
11
12
13
14
15
16
17
18
19
20
21
22
23
24
25
26
27
28
29
30
31
| public class MyWelcomeActivity extends WelcomeActivity {
@Override
protected WelcomeConfiguration configuration() {
return new WelcomeConfiguration.Builder(this)
.defaultTitleTypefacePath("Montserrat-Bold.ttf")
.defaultHeaderTypefacePath("Montserrat-Bold.ttf")
.page(new BasicPage(R.drawable.ic_edit_white,
"易笔记",
"一款简易的笔记系统")
.background(R.color.blue_background)
)
.page(new BasicPage(R.drawable.ic_group_1,
"我们是谁?",
"我们是来自180813的一个Android小组")
.background(R.color.orange_background)
)
.page(new BasicPage(R.drawable.ic_lightning,
"开始",
"下面请开始您的学习之旅吧!")
.background(R.color.red_background)
)
.swipeToDismiss(true)
.exitAnimation(android.R.anim.fade_out)
.build();
}
}
|
效果如下:
demo3.gif
侧拉栏
这个应该是我找到比较UI好看的一个侧拉栏,功能也比较多
1
2
| final def lastestMaterialDrawerRelease = '6.1.2'
implementation "com.mikepenz:materialdrawer:$lastestMaterialDrawerRelease"
|
代码如下,侧拉栏的项比较多,但是很多功能都是没有开发的,只是单纯填充一下栏目。
1
2
3
4
5
6
7
8
9
10
11
12
13
14
15
16
17
18
19
20
21
22
23
24
25
26
27
28
29
30
31
32
33
34
35
36
37
38
39
40
41
42
43
44
45
46
47
48
49
50
51
52
53
54
55
56
57
58
59
60
61
62
63
64
65
66
67
68
69
70
71
72
73
74
75
76
77
78
79
80
81
82
83
84
85
86
87
88
89
90
91
92
93
94
95
96
97
98
99
100
101
102
| public void InitDrawer(){
PrimaryDrawerItem item1 = new PrimaryDrawerItem()
.withIdentifier(1)
.withName("用户")
.withBadge(">")
.withIcon(R.drawable.ic_user);
SecondaryDrawerItem item2 = new SecondaryDrawerItem()
.withIdentifier(2)
.withName("设置")
.withBadge(">")
.withIcon(R.drawable.ic_user_settings);
SecondaryDrawerItem item3 = new SecondaryDrawerItem()
.withIdentifier(3)
.withName("密码")
.withBadge(">")
.withIcon(R.drawable.ic_pass);
SecondaryDrawerItem item4 = new SecondaryDrawerItem()
.withIdentifier(4)
.withName("收藏夹")
.withBadge(">")
.withBadgeStyle(new BadgeStyle())
.withIcon(R.drawable.ic_star);
SecondaryDrawerItem item5 = new SecondaryDrawerItem()
.withIdentifier(5)
.withName("上传")
.withBadge(">")
.withIcon(R.drawable.ic_upload);
DividerDrawerItem item6=new DividerDrawerItem()
.withIdentifier(7);
SwitchDrawerItem item7=new SwitchDrawerItem()
.withIdentifier(6)
.withName("退出")
.withIcon(R.drawable.ic_close);
SecondaryDrawerItem item8 = new SecondaryDrawerItem()
.withIdentifier(8)
.withName("关于")
.withBadge(">")
.withIcon(R.drawable.ic_about);
AccountHeader headerResult = new AccountHeaderBuilder()
.withActivity(this)
.withHeaderBackground(R.drawable.ic_background_1)
.addProfiles(
new ProfileDrawerItem()
.withName("七友")
.withEmail("hackfun@foxmail.com")
.withIcon(getResources().getDrawable(R.drawable.ic_avatar))
)
.withOnAccountHeaderListener(new AccountHeader.OnAccountHeaderListener() {
@Override
public boolean onProfileChanged(View view, IProfile profile, boolean currentProfile) {
return false;
}
})
.build();
Toolbar toolbar = findViewById(R.id.toolbar);
setSupportActionBar(toolbar);
Drawer result = new DrawerBuilder()
.withActivity(this)
.withToolbar(toolbar)
.withAccountHeader(headerResult)
.addDrawerItems(
item1,
item2,
item3,
item4,
item5,
item6,
item7,
item8
)
.withOnDrawerItemClickListener(new Drawer.OnDrawerItemClickListener() {
@Override
public boolean onItemClick(View view, int position, IDrawerItem drawerItem) {
switch (position){
case 8:
Intent intent=new Intent(MainActivity.this,AboutActivity.class);
startActivity(intent);
break;
default:
new SweetAlertDialog(MainActivity.this, SweetAlertDialog.WARNING_TYPE)
.setTitleText("提示")
.setContentText("此功能还没开发,敬请期待")
.setConfirmText("好的")
.show();
}
return false;
}
})
.withFullscreen(true)
.build();
getSupportActionBar().setDisplayHomeAsUpEnabled(false);
result.getActionBarDrawerToggle().setDrawerIndicatorEnabled(true);
}
|
效果如下:
demo4.gif
About
一个关于页面
1
| implementation 'com.stephentuso:welcome:1.4.1'
|
代码如下:
1
2
3
4
5
6
7
8
9
10
11
12
13
14
15
16
17
18
19
20
21
22
23
24
25
26
27
28
29
30
31
32
33
34
35
36
37
38
39
40
41
42
43
| public class AboutActivity extends Activity {
@Override
protected void onCreate(Bundle savedInstanceState) {
super.onCreate(savedInstanceState);
setTheme(R.style.AppThemeDark);
AboutView view = AboutBuilder.with(this)
.setPhoto(R.drawable.ic_pen_2)
.setCover(R.mipmap.profile_cover)
.setName("易笔记")
.setSubTitle("内测版")
.setBrief("一款简易的笔记系统")
.setAppIcon(R.mipmap.ic_launcher)
.setAppName(R.string.app_name)
.addWebsiteLink("https://www.redteaming.top")
.addGitHubLink("hack2fun")
.addTwitterLink("byqiyou")
.addEmailLink("hack2fun@foxmail.com")
.addGoogleLink("")
.setVersionNameAsAppSubTitle()
.setLinksAnimated(true)
.setShowAsCard(true)
.addAction(R.mipmap.star,"五星好评",(Intent) null)
.addAction(R.mipmap.share,"分享",(Intent) null)
.addAction(R.mipmap.update,"更新",(Intent) null)
.addAction(R.mipmap.email,"联系我们",(Intent) null)
.addAction(R.mipmap.intrduce,"介绍",(Intent) null)
.addAction(R.mipmap.facebook,"反馈",(Intent) null)
.addAction(R.mipmap.help,"帮助",(Intent) null)
.addAction(R.mipmap.changelog,"历史版本",(Intent) null)
.addAction(R.mipmap.ads,"广告",(Intent) null)
.addAction(R.mipmap.donate,"捐赠",(Intent) null)
.setWrapScrollView(true)
.build();
FrameLayout.LayoutParams params = new FrameLayout.LayoutParams(
FrameLayout.LayoutParams.WRAP_CONTENT,
FrameLayout.LayoutParams.WRAP_CONTENT);
addContentView(view, params);
}
}
|
layout文件
1
2
3
4
5
6
7
8
9
10
11
12
13
14
15
16
17
18
19
20
21
22
23
24
25
26
| <?xml version="1.0" encoding="utf-8"?>
<LinearLayout xmlns:android="http://schemas.android.com/apk/res/android"
android:layout_width="match_parent"
android:layout_height="match_parent">
<LinearLayout
android:layout_width="match_parent"
android:layout_height="wrap_content">
<androidx.appcompat.widget.AppCompatButton
android:id="@+id/dark"
android:layout_width="0dp"
android:layout_height="wrap_content"
android:layout_weight="0.33"
android:text="dark_theme" />
</LinearLayout>
<FrameLayout
android:id="@+id/about"
android:layout_width="match_parent"
android:layout_height="match_parent">
</FrameLayout>
</LinearLayout>
|
demo5.gif
other
还有其它功能由于篇幅原因这里就不展示了
后记
因为大部分精力都花在了搞安全上面,这个app基本都是碎片时间写的,搞了一周左右。最后由于各种原因没有把这个app完善(主要还是没时间),感觉还是挺可惜的,以后有时间再搞了
最后更新时间:
know it then hack it